A Masterclass
What you will learn
Students will get an in depth knowledge of Functionality of AutoCAD Electrical software.
Using this knowledge, students can create professional electrical control drawings
This course covers a wide range of tools and features such as schematic drawings, Circuit Builder, panel drawings, parametric and nonparametric PLC modules
This will help the students to create electrical drawings easily and effectively.
Description
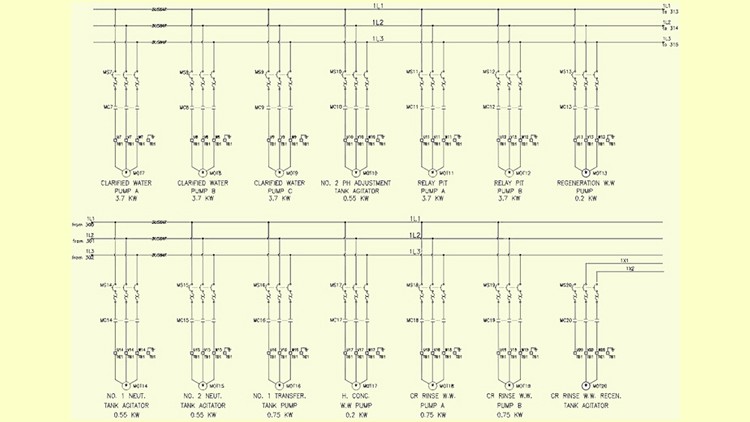
AutoCAD Electrical is the software of the AutoCAD suite which is intended to help control designers with the creation and modification of control systems. This software has extended features to automate control engineering tasks, such as building circuits, numbering wires, and creating bills.
For electrical engineers it is good for making circuit layout to power plant layout. This module include electrical schematic components, automatic report generation, PLC I/O drawing for spreadsheet, and so on.
This course is basically designed to assist the engineering students and the practicing designers. Keeping in view the varied requirements of the students, this course covers a wide range of tools and features such as schematic drawings, Circuit Builder, panel drawings, parametric and non-parametric PLC modules, stand-alone PLC I/O points, ladder diagrams, point-to-point wiring diagrams, report generation, creation of symbols, and so on. On the completion of this course, students will be able to create electrical drawings easily and effectively.
Salient Features of this Course:
- A comprehensive course consisting of 140 video lectures that are organized in a pedagogical sequence.
- Detailed explanation of all AutoCAD Electrical commands and tools.
- Step-by-step instructions to guide the users through the learning process.
- Practice Examples
- Practice Test
- Certificate of Completion
Content
Introduction to AutoCAD Electrical
Working with Project Manager
Working with Wires
Creating and Modifying Ladder Diagrams
Schematic Components Insertion
Schematic Components Editing
Connectors
Working with Circuits
Creating and Modifying Panel Layouts
Generating and Customizing Reports
PLC Modules
Terminals
Project and Drawing Properties
Title Blocks and Templates
Customizing Symbols and Understanding Various Miscellaneous Tools
Self-Assesment Test
Overview: Why This Masterclass Cuts Through the Noise
Look, if you’ve been grinding away in standard AutoCAD trying to manually draw electrical schematics with lines, circles, and basic blocks, you’re essentially trying to build a skyscraper with a hand-drill. I’ve seen plenty of “comprehensive” guides over the years, but the Complete Course in AutoCAD Electrical 2022 actually lives up to the “Masterclass” label. It doesn’t just teach you where the buttons are; it shifts your mindset from drafting to Electrical CAD automation.
What stood out to me immediately wasn’t just the sheer volume of content—it was the focus on logic. AutoCAD Electrical is a different beast compared to its vanilla counterpart because it relies on a database-driven architecture. This course respects that. It tackles the steep learning curve of the 2022 interface while ensuring you understand how industry-standard tools handle things like automated wire numbering and component tagging. If you’re looking to move from “drawing” to “engineering design,” this is where the transformation happens. It’s less about making things look pretty and more about creating job-ready skills that prevent expensive errors on the factory floor.
Prerequisites: What You Actually Need Before Starting
You don’t need a PhD in Electrical Engineering, but don’t walk in totally blind. To get the most out of these hands-on labs, you should have:
- A fundamental understanding of basic electrical theory (knowing your N.O. from your N.C. contacts).
- Basic computer literacy and, ideally, a passing familiarity with the standard AutoCAD interface (though the course does a decent job of holding your hand from beginner to advanced levels).
- Access to the AutoCAD Electrical software (the 2022 version is highlighted, but the core logic applies to 2023 and 2024 versions as well).
- A mindset for real-world projects; you aren’t just clicking icons, you’re building systems.
Skills & Tools: Mastering the Intelligent Design Environment
The depth of tools covered here is impressive. We’re talking about moving beyond simple lines and into smart schematic drawings. The course shines when it dives into:
- Circuit Builder: This is a game-changer for anyone tired of repetitive tasks. You’ll learn to automate the insertion of motor control circuits and power feeds.
- PLC Modules: One of the biggest hurdles for designers is handling parametric and nonparametric PLC modules. This course breaks down how to manage I/O points without losing your mind.
- Panel Layouts: You’ll learn how to bridge the gap between a 2D schematic and a physical panel drawing, ensuring that what you design actually fits in the real-world enclosure.
- Automated Reporting: You’ll master the art of generating a Bill of Materials (BOM), wire lists, and from/to reports with a single click—skills that are essential for career growth in project management.
Career Benefits & Job Roles: From Drafter to Design Engineer
Let’s talk about the bottom line: your career. Mastering this software isn’t just a “nice to have”; it’s a requirement for high-paying roles in industrial automation and power distribution. By completing this course, you’re positioning yourself for certification prep and a significant bump in market value.
Common job roles that require these specific job-ready skills include:
- Electrical Designer: Designing complex control systems for manufacturing plants.
- Control Systems Engineer: Developing the schematics that tell a PLC how to run a multi-million dollar assembly line.
- Panel Shop Manager: Overseeing the physical build-out of electrical enclosures using precise industry-standard tools.
- BIM Technician (Electrical): Working within larger construction workflows to ensure electrical systems are integrated correctly.
Pros: Why This Course Wins
- Workflow-Centric Approach: It doesn’t just teach commands; it teaches the “why” behind the Electrical CAD workflow, which is vital for long-term career growth.
- Deep Dive into PLCs: The sections on parametric PLC modules are some of the clearest I’ve seen, turning a complex topic into something manageable for a beginner.
- Focus on Accuracy: The emphasis on cross-referencing and error-checking tools ensures you’re producing professional electrical control drawings that actually work in the field.
Cons: The Honest Truth
The only real “hiccup” is that the Circuit Builder section can feel a bit overwhelming for a true novice. While the software is designed to automate things, the setup for custom circuits requires a level of detail that might require you to watch the modules twice. It’s a steep climb, but it’s the price you pay for mastering real-world projects.