Designing your own believable vehicle using most of 3D Coat modeling and sculpting toolset.
What you will learn
Advanced vehicle concept design in 3D Coat
Description
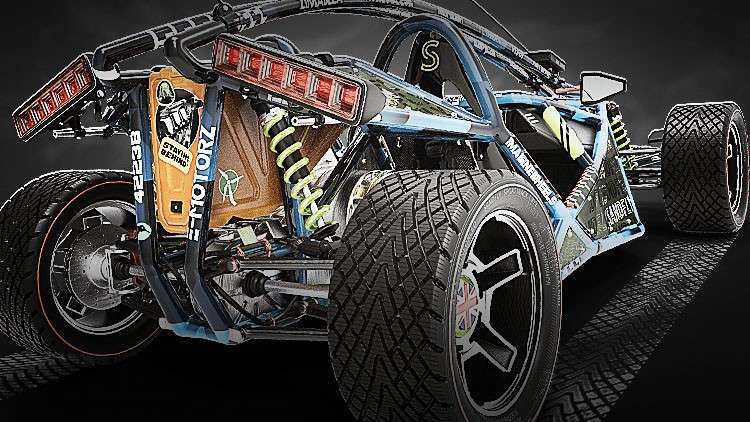
In this comprehensive tutorial, you will delve into the intricacies of constructing a realistic and visually compelling vehicle using the diverse array of modeling and sculpting tools offered by 3D Coat. Designed for intermediate to advanced users, this tutorial serves as a hands-on guide to enhance your proficiency in vehicle design within the 3D Coat environment.
If you are relatively new to 3D Coat, it is recommended that you first explore the “Designing Massive Mech” tutorial, the predecessor to this course. This foundational tutorial will equip you with the essential skills and knowledge needed to seamlessly transition into the complexities of vehicle construction.
One of the standout features of 3D Coat is its unparalleled ability to facilitate rapid iteration on your designs, empowering you to refine and elevate your skills as a designer. The toolset within 3D Coat allows for dynamic experimentation, fostering a creative environment where your ideas can evolve and improve iteratively.
Throughout the tutorial, you will be guided through the step-by-step process of crafting the vehicle’s main frame. Additionally, you will learn to create a myriad of intricate details, including but not limited to tires, radios, motors, suspension systems, antennas, and more. This holistic approach ensures that you gain a comprehensive understanding of the entire vehicle design process, from the foundational structure to the intricate components that bring it to life.
By the end of this tutorial, you will not only have a fully realized and believable 3D model of a vehicle but also a heightened proficiency in utilizing the advanced features of 3D Coat. Whether you aspire to enhance your portfolio, pursue a career in 3D modeling and design, or simply want to expand your skill set, this tutorial offers an immersive and valuable learning experience for those seeking to master the art of crafting realistic 3D vehicles.
Content