• Post category:StudyBullet-8
  • Reading time:10 mins read


Learn Arduino by building a 3d printed Iron Man Arm with Voice Recognition, Accelerometer, Sounds, and more electronic

What you will learn

Programming Arduino.

Programming the Arduino to work with each of the electronic component

Connecting all of the Peripherals component that are in the bionic arm to an Arduino, such as : Leds, Lasers, Accelerometer unit, Voice recognition,sounds etc.

How to Program the Voice Recognition Unit with your own voice, and how to connect it to the Arduino + programming Arduino to communicate with the component.

Connecting all of the parts, i will give you my schematic – very easy to read, with photos and i will explain it with Videos for every step

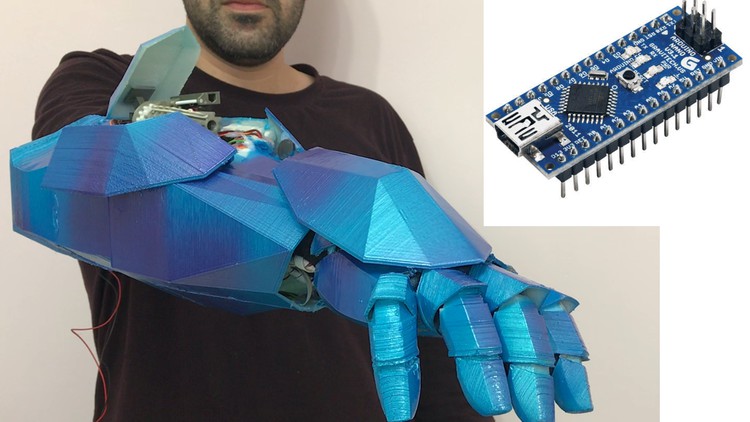
Building Bionic ARM, Fully functional with Voice Recognition, Sounds, rubber band minigun and much more!

How to 3D print the parts of the bionic arm

How to upload the sounds to the Sound Card

Where to buy all of the electronic parts needed!

Description

In this Arduino Course you will Learn how to build your own Fully functional 3D printed Arm with Arduino and also with Arduino electronic components! 

I will show and explain to you in the Videos how to connect everything together so at the end you will have your own product, your own working Bionic Arm!

Students saying:

  • Juan Ricardo: Thanks for the course, please make more creative courses like this one it’s the best way to learn!
  • Or Itzhak: WOW This is Amazing course!!! The explanations are very clear. Thank you so much

we will use Arduino nano for this Arduino course.

This includes everything that is shown in the video such as:

  1. Voice recognition
  2. Sounds
  3. Led lights with sounds
  4. Small minigun for shooting rubber band with voice commands
  5. Servo motors
  6. Leds
  7. Lasers that are controlled by the hand movements.
  8. Accelerometer for the hand movements (I will also show how to use the MPU6050 – that has also Gyro and Temperature sensor)

I will teach you how to print the parts so it will fit all together, I will give you the sources of the arm 3d printer files (.stl files that are supported for all of the 3d printers).


Get Instant Notification of New Courses on our Telegram channel.


I will give you my schematic and explain you and show you within the videos how to connect the components to the Arduino and every step I am making will be filmed!

I will provide you my source code for the Arduino!

I am showing you everything and giving you the sources you need for making your own arm!

As for the parts of the Bionic arm I am making one lecture that explains where and what to buy so you will have all of the links for the components you need to buy for building the Bionic Arm.

so all you need to do is: join this journey today!

With the knowledge you will get here you can also build your own smart home with the Arduino and the voice recognition and the sound board unit and many other projects.

English
language

Content

Introduction

Course Preview
Bionic Arm building course go through
Parts List + where to buy list(must watch before starting!)
Install Arduino coding software

Printing the 3d parts

Forearm 3d parts and explanation + sources attached
Hatch door 3d parts and explanation + sources attached
Hand 3d parts and explanation + sources attached
Rubber band minigun 3d parts and explanation +sourced attached +credits
The electronic parts overview
Electronic parts placement on the 3d models

Connecting the arm first 3d parts together

Connecting the arm first 3d parts together

Sound Card Unit

Uploading Sounds to the Sound Card memory
Connecting the Speakers to the Sound Card
Connecting the Sound Card to the Arduino

Voice Recognition Unit

Load Voice recognition programming software
How to connect the Voice Recognition to FTDI (USB to Serial) unit
How to Record your commands to the Voice recognition + Code commands
Connecting the Voice Recognition to the Arduino
Load the Arduino with program that checks that Voice recognition controls sounds

Connecting 4 Servo motors, 3 for the Cover Hatch and 1 for rubber band gun

Running a 360 degrees servo vs regular servo, example code for Arduino
Connecting the rubber band minigun 3d parts with 360 servo motor
Connecting the rubber band minigun to the Bionic Arm 3D Parts
connecting the back hatch regular servo to the 3d parts
connecting the side Hatch regular servos to the 3d parts
Connecting the wires of the 4 servos to the arduino
Upload to the Arduino with program and check the Hatch opening and shooting

Connecting the Lasers and it’s Servo motor

Glue the Servo motor to the bionic arm and to the hatch front cover
Connecting the wires needed to the front servo and the laser
Glue the Two KY-008 Lasers+wiring to arduino
Program the Arduino with code to check the Servo Motor and the Lasers

The Hand part

Gluing 6 Leds on the Hand part(note the polarity before gluing)
Connecting the leds together by the schematic
Connect the Leds to the Mosfet RFP30N06LE and 22ohm Resistor
Connect wires and glue the Accelerometer MPU6050 to the Hand 3d part
Connect the Fingers 3d parts and the glove to the Hand 3d part
Connecting the hand cover 3d part to the hand 3d part
Connect wires from the MPU and the Leds to the arduino
How to run the MPU6050
Test that the MPU controls leds and the Lasers+their Servo motor

Connecting Arduino Power Source of 9 Volt

Connect the Batteries Power Source+The Capacitor+micro switch

Place the arduino and connect the rest of the Arm

placing the arduino + the sound card+ the voice recognition module
glue the elbow 3d part and the speakers to the elbow

Programming The Arduino

Loading my sounds to the sound card+Recording my commands to voice recognition
Introduction to the Full Arduino code
Uploading the Code to the Arduino
Glue the arduino cover 3d part
Test the Arm, and have fun with it

Bonus Lecture!

My Udemy courses coupons!