The first complete Blender 3 course covering all the fundamentals of 3D modelling that is created for all user levels.
What you will learn
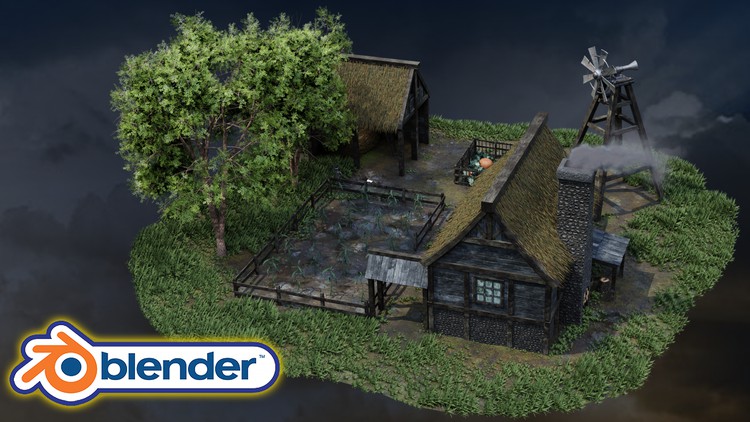
• Following through a complete guide on creating a set of AAA game-ready quality medieval farmstead, including a barn, farmhouse, and living plants
• Maximising the potential of your references to develop strong game asset concepts
• Using Blender 3.0 and understanding its new interface and shortcuts
• Mastering the Blender 3.0 geo nodes system
• Learning how to texture paint with 3 different textures on one mesh
• Completing a roof building masterclass, including straw and grass roofs
• A course within a course introduction into (a) Blender basics, (b) materials and textures, (c) seams, sharps, and UVs.
• Discovering the basics of rigging and animating inanimate game assets in Blender
• Simulating realistic smoke
• Implementing a water simulation with a stop and start
• Learning how to use HDRIs as 3D model backgrounds for your portfolio
• Maintaining and optimising medieval Europe aesthetics
• Effective problem-solving in Blender
• Complete UV Mapping Guide: UV mapping and UV unwrapping your model
• Learning how to use rendering to improve the quality of presentation for your 3D environment in Blender Cycles and Cycles X
• Rendering game assets to a high level for professional 3D artist portfolios
Description
An upgrade to Blender 3 won’t cost you anything.
How can a Blender 3 course improve your life?
I used to be apprehensive about new Blender updates. They made me feel like I had fallen behind.
The key to deciphering new software updates is practice. You need to relieve this anxiety you’re feeling with a medieval-themed project filled with challenges super-useful solutions!
What are the top 5 things you can get out of this course?
1. We will be using the Blender 3 asset manager in various ways;
2. You will be exploring Blender’s particle systems, including grass and straw roofs;
3. A water simulation with a stop and start will be part of your scene;
4. We will be simulating realistic smoke, and;
5. You will be texture painting with 3 different textures on one mesh.
Start learning with Blender 3 The Ultimate Medieval Scene Course!
I can imagine this going very well with your medieval well and medieval castle keep with or without slight modifications to your existing scene.
Blender 3 The Ultimate Medieval Scene Course will see you creating a medieval farmstead. Your medieval farmstead will feature farmhouses, grass, mud, plants, trees, a water pump, and a windmill.
IT WILL BE ALIVE because of all the exciting plant growing animations it will feature.
This course will give you access to just over 16 hours of 3D art.
This course will see you learn all the techniques pros use and how they use them. Learning how to achieve realism through ageing your 3D game environments will be a central part of this course’s learning objectives!
Through reading this course description you will find out:
– What you want to learn about 3D modelling;
– What you are going to get through Blender 3 The Ultimate Medieval Scene Course, and;
– How the course will take your 3D modelling, and animation skills to the next level.
Modeling
I enjoy creating little props that can bring a scene to life. One of the things you can do to add to realism within your scenes is to create plenty of small props to make the scene look busy.
Our Blender 3 The Ultimate Medieval Scene Course will focus on adding little details to enhance a 3D environment. Among other character-boosting assets, you will find out how to make a pitchfork and ladders, and where to place them. Learning about correct placement will allow you to make your 3D modelling skills stand out more than before.
Texturing and Materials
Blender 3 The Ultimate Medieval Scene Course will provide you with intensive learning all in one place, giving you access to over 16 textures, and 80 texture maps at 2 k resolution. Most importantly, I will be sharing techniques of how to use vertex painting to use multiple materials to paint on a single mesh.
The node wrangler is one of the best free built-in addons within Blender but most users are not even aware of it. This course will teach you how to create your materials, find out how to take all of those beautiful texture maps and make use of them.
Creating your materials or altering textures on the fly is something you will want to learn about. Maximising your knowledge of Blender’s node system will raise the level of your textures and skill up your skill in working with materials.
Animation
As part of this Blender 3 The Ultimate Medieval Scene Course course, you will learn how to use keyframes to key in different animations to the parts we want to animate. We will be growing plants and vegetables in the two small designated growing areas.
A key part of our new course will involve learning how to use geo nodes in Blender 3. We will use them to make these plant animations.
Designing node groups is different in Blender 3 and you will unlock just how to achieve these effects with my guidance.
Lighting and Rendering
When we look at renders of 3D models on social media, we can see a huge difference between models of different artists. Most of this can be normally attributed to not only the skills of the artist but part of it can be attributed to how they achieve realism in their models.
By joining Blender 3 The Ultimate Medieval Scene Course, you will learn about specific types of in-built Blender lighting functionalities that will enhance the rainy weather atmosphere of your medieval farmstead.
We will be going through the many pitfalls and some technical details of what Cycles render options to use for the specific machine you are using. I will also be introducing you to the all-new Cycles X Blender renderer.
Together, we will be creating a portfolio render for any multimedia site you wish to upload your completed model to.
Blender 3 The Ultimate Medieval Scene Course is a complete guide into using Cycles, and Cycles X for lighting, rendering, and shadow.
Course Resources and Freebies
The Blender 3 The Ultimate Medieval Scene Course resource pack includes 16 textures, and 80 texture maps at 2 k resolution, 13 references, 4 HDRI maps, 1 HDRI portfolio gradient map. blend file, and 1 human reference.
Join this course and come be part of a 3D modelling journey of over 16 hours of learning that will see you go away with a game-ready AAA medieval game environment full of life and animation.
Check out the free introduction and I am sure you won’t be able to put this course down!
Still unsure? Then, let me tell you what’s unique about this course:
· Following through a complete guide on creating a AAA game-ready quality medieval farmstead, including a barn, farmhouse, and living plants
· Maximising the potential of your references to develop strong game asset concepts
· Discovering the basics of rigging and animating inanimate game assets in Blender 3
· Learning how to use HDRIs as 3D model backgrounds for your portfolio
· Maintaining and optimising medieval Europe aesthetics
· Learning how to use rendering to improve the quality of presentation for your 3D environment in Blender Cycles and Cycles X
· Rendering game assets to a high level for professional 3D artist portfolios
Let’s create something history inspired and full of life this February!
To get you pumped, imagine how well this prop fits in with your other 3D Tudor projects.
You can include your medieval farmstead environment model outside your castle keep as part of our Creating a Modular Kitbash in Blender course, nearby to your medieval in or tavern based on Blender 2.8 Complete Beginners Guide to 3D Modelling a Scene, or next to your medieval well or windmill using Blender 2.8 Creating your First 3D Game Model and Blender to Unreal Engine 5 respectively.
Until next time, happy modelling everyone!
Neil – 3D Tudor
Content